Visual Elements of a Design

There are four basic visual elements in a figurative origami design: 

  1. Outline

  2. Surface Lines

  3. Hierarchy of Layers 

  4. Visible Creases

Here, I would like to delve a little deeper into each element using my 22.5 degree based pig design to illustrate. But first I have to acknowledge that this is by no means comprehensive, nor is it the only way to appraise a design.

Outline

The first element is the outline of the folded figure. It refers to the physical space that the model occupies. The outline should match up with the outline of the actual figure. This element includes the configuration, placement, and proportions of body parts.

It should be easy to identify the subject of the model solely from the outline.

Below is the outline of my pig. Notice that the bulk of the area lies within the body and head which makes it look more “fat”. This is aided by the pointiness and shortness of the legs that bring the body close to the ground. Additionally, the lines are strictly based on multiples of 22.5 degree angles. 

Surface Lines

The second element is the lines—edges of layers, flaps—on the surface of the model that mark out the subject’s anatomy—specifically muscles, body parts, or color changes within the outline. 

A great design avoids unnecessary or misplaced lines—ones that don’t represent a specific characteristic of the subject. It utilizes its lines in an efficient manner, accurately depicting the visual aspects of the subject—nothing more, nothing less.

Again, looking at the first image below, one can see that the lines are strictly based on multiples of 22.5. The hind leg line defines the distinction between the torso and the leg. The combination of lines around the front leg forms a shoulder as well as a lower section for the fore leg. 

In the image below, notice the symmetry between the front and hind leg sections. Utilizing symmetry can make a design more interesting. 

In the next image, one can see that the marked 22.5 lines (edges of folds) radiate from a single point.

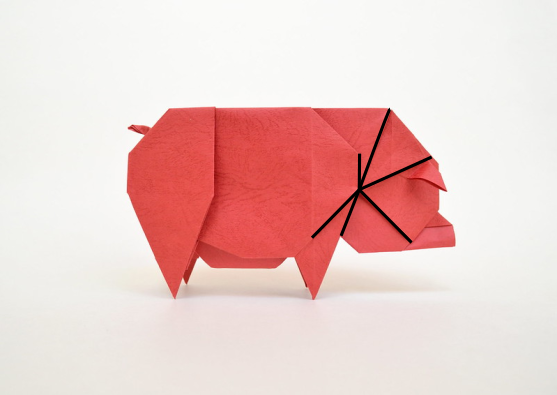
In addition, there are surface lines that emphasize “fatness” through layers in the belly and neck area. The line on the belly angles up, which shifts the weight toward the front.


Hierarchy of Layers

The third element is the hierarchy or direction of the layers. In other words, how are the model’s layers arranged? This is again based on the anatomy of the subject.

Below is a figure of the different layers in the pig design. The lighter the color the higher the layer is relative to others.

Here is another perspective. The arrows show the direction of the gaps between the layers.

The hierarchy of layers should be relatively intuitive, but also based on the designer’s preferences and on what the design of the model allows. In the pig example, the belly layer is lower than the torso, and the torso is lower than the hind leg.


Visible Creases

The fourth element is the visible creases in the final model that are not folded. They are either left from precreasing or added in after. In the pig example shown below, there is a vertical crease running down the front leg. The top was created during precreasing, and the bottom added in. The two near the ear were created during shaping.

In general, a model looks cleaner with fewer visible creases, so folders should try to limit unnecessary creases, especially during the precreasing process. However, there are times when adding creases helps to enhance or show certain geometric relations, such as the 45 degree crease near the ear. The vertical crease near the ear was unnecessary; I eliminated that crease in later folds of the pig.


Final Thoughts

While there can be other important design aspects, efficient and effective display of these four fundamental elements form the basis of a great model.

Condensed Diagramming: A More Efficient Way to Diagram Complex Models

Every origami designer who diagrams knows how tedious and time consuming it is to produce them. In fact, the amount of effort required is the reason why there is a lack of diagrammers in the origami community. That is why I propose a new method of diagramming complex models called condensed diagramming.

Unlike traditional diagramming which breaks down each folding movement into one or more individual steps, condensed diagramming attempts to group as many steps as possible without compromising too much information. In essence, it is a fusion between a crease pattern and a set of diagrams. As such, it requires familiarity with crease patterns and a high level of experience in folding.

The process of condensed diagramming follows the three steps of folding origami: precreasing, collapsing, and shaping.

Precreasing

Traditionally, precreasing is done with each individual crease displayed its own step. However, this is greatly inefficient, especially for veteran folders who can read crease patterns. Condensed diagramming streamlines the precreasing process by displaying sets of precreases in a logical sequence. In other words, it guides the folder through the crease pattern reading process by showing the general order of precreases. In each new step, previous precreases are grayed out, while new precreases are bolded. Folders should be able to figure out each crease based on existing references. Below is a photo of my goat design and its crease pattern, followed by steps 1 and 2 of 4 total steps in the precrease for the model.

Screenshot_2020-04-13_15-28-45.png
Screenshot_2020-04-13_15-21-01.png

As you can see, in two steps we condensed what would otherwise have taken at least 10 steps in the traditional method of diagramming. It is up to the designer to determine the number of creases per step in order to maximize efficiency without compromising clarity. It should be fairly easy to understand for the folder, but most importantly, it allows the diagrammer to eliminate a significant amount of time and effort.


Collapsing

The collapsing process adopts the same approach of condensing multiple steps into one. It uses different colors for mountain and valley folds to display one or more collapses in a crease pattern, supplemented with the collapsed base underneath. Below are steps 1 and 2 out of 6 total steps in the entire collapsing process for the goat. The method is not perfect as you can see in step 2; it leaves out some of the mountain and valley folds that are assumed to be relatively straightforward. But supplemented with the collapsed base, it should provide enough information for an experienced folder to accomplish the step. 

Screenshot_2020-04-13_15-20-53.png


Shaping

Lastly, shaping is presented as a general guideline, allowing different interpretations of the piece. Multiple shaping details are suggested on each step; the extent of details depends on how much the designer wants to show. The folder can also refer to the model photo for shaping details. Below is the entirety of the shaping displayed for the goat.

Screenshot_2020-04-13_15-21-26.png

The adoption of condensed diagramming has the potential to increase the output of complex model diagrams. For the designer, it can shorten diagramming to under 25% the time it would take to diagram traditionally, and eliminates a lot of tedious work few enjoy doing. Although not as detailed as traditional diagramming, it provides significant improvement over folding just from crease patterns. While condensed diagramming is still in its infancy, I plan on refining it, and possibly publishing a book using this diagramming technique. I also encourage other designers to contribute to its development.